Tag Archives: tutorial

Dominant and resessive

We’ve been having a bit of a conversation in the naknimitmo group regarding color work and yarn dominance. If you’ve never heard of yarn dominance the basic idea is that the stitches made with one yarn stand out more than the other based on how you’re holding them. Yarn dominance only comes into play when you’re knitting with two strands and it only matters at the edges between the two colors. But when it matters it can matter a lot.

The dominant yarn is always the one you hold closer to the fabric or under the other strand or strands. In this case I’m holding the white yarn dominant:

CameraZOOM-20150122131323691

When working with two colors I normally hold both yarns in my right hand like this:

CameraZOOM-20150122131242408

You can also hold one in each hand. Since I don’t knit continental I find this slows me down although it’s a pretty good trick when I want to knit with three colors in a single row.

CameraZOOM-20150122131109351

I’m only brushing the surface here on “ways to hold your yarn.” I’m not even trying to cover things like yarn guides, or where to put third or fourth strands if you’re doing more than two colors in a row. Every knitter has their own preferences, techniques, and tricks for maintaining tension. I think the goal for stranded colorwork is to find something you’re comfortable with that doesn’t involve dropping and picking up each yarn as you go. (and hey, if you don’t think that slows you waaaay down, go for it)

But no matter where you hold the yarns or how you knit the dominant yarn is the one closest to the fabric and this makes the stitches just slightly bigger. If you’re looking at your hands and you still can’t figure out which is dominant my suggestion is to knit TWO gauge swatches. I know many knitters dislike them. But there’s really no better way to see how much yarn dominance is going to affect your knitting than to try it out. Any time one stitch is surrounded by a sea of the other color, or you have a diagonal line of single stitches, or little curlicues, or anything like that and you usually want the motif yarn to be dominant. That’d be whichever color your using for the flecks, lines, curlicues, flowers, and snowflakes.

I discovered something else about yarn dominance recently. It really matters when knitting corrugated ribbing. The dominant yarn should be the knit stitches, purls need to be the recessive yarn. If you get it backwards:

purls dominant

Then it just looks wrong. The purls are trying to come forward which just doesn’t work. Even the stitches themselves know that purls are supposed to recede. Poor things look so awkward. If you reverse things (ie frog it all and try again) and put the knit color yarn in the dominant spot:

knits dominant

See how much happier everything looks? The knits are coming forward just as they should. The purls are happily receding. So even though I’m using the white yarn as the dominant color in the hand of this mitten it needs to be recessive in the cuff. Sometimes I learn these things the hard way. Hopefully you can learn from my mistakes so you don’t have to make them yourself!

Turned hems

We were sitting around the fire at knitting camp, discussing different types of hem treatments (as you do) and I realized I have a favorite kind of hem. I love turned hems*. The turned hem is just a little bit of stockinette fabric which you fold to the inside of your garment/hat/mitts etc… They’re so neat, so tidy, so fully customizable. Really, what’s not to love?

turned hems

Well, apparently some people don’t love the seaming. But seriously, it’s a tiny little chore at the end of your knitting. It goes quickly, and I think I can show you a few tips that’ll make it (dare I suggest this?) way more fun. First, let’s go over some turned hem options.

The basic turned hem is, essentially, an invisible edge to your knitting. And this is why I love it. You can work a nice, smooth, stockinette stitch fabric right to the very edge. No need to break up the flow with ribbing, garter stitch, or to be constantly fighting the curl of the fabric:

plain edge hems

Now to get this neat, uninterrupted fabric, that little bit of fabric on the inside needs to be slightly smaller than the rest of the fabric (otherwise it’ll flare out at the edge) The common way to do this is to go down a needle size. Knitting a sweater on US 8’s? Knit the hem on 7’s. A hat on size 2’s needs a hem knit on size 1’s.

lined hems

And know what’s another great thing about turned hems? The extra fabric right at the hem can be exactly what you need over your ears on a cold wintery day. AND the turned hem hides the stranded back side of the fabric. Have you ever gotten the back of an earring stuck on the inside of a stranded hat? I can’t recommend the experience…

Anyway, where was I? Oh right, once you’ve finished the lining fabric you go to whatever needle size give you true gauge for the project, work a turning row (generally a single purl row on the right side of the fabric) and continue merrily along.

But what if you don’t have the next needle size down? Another option is to use slightly fewer stitches in your hem. You really don’t need the the hem more than 1 inch smaller, so cast on a handful less stitches than you need, and work some m1p’s in that turning row for a well hidden increase. Or if it’s a top-down garment work some p2tog’s in the turning row before working your hem. You get the idea!

twisted hems

Another fun option for making smaller hems on the same sized needles is to create a biased fabric. This is easy-peasy. Just knit every stitch through the back loop. The stitches will all be a little tighter than in your normal fabric and volia! You’ve got a lovely, sturdy hem on the inside of your garment.

I also use the turned hem a lot for knitting where I want a picot edging. Instead of the plain row of purl stitches for the fold line I spice things up a bit with a *p2tog, yo* repeat for the turning row**. It makes for a row of purls and holes which becomes an lovely little design detail once the lining is sewn up.

picot hems

Usually for these garments I DON’T make the hem liner any smaller. I use the same needle size, same number of stitches – I think the slight flare of the fabric accents the feminine look of the picot edge.

Right – about that sewing. I suspect that knitters don’t like sewing because it’s not as precise. When your knitting your stitches are all lined up on the needles and you know exactly what happens next. With sewing you have a great swath of fabric- and do you make your stitches half an inch long? an eighth of an inch? Or what? So here’s a great little secret for seaming turned hems – you’re just connecting the back sides of knitted loops. Like this:

Fold the hem up, making sure that the fabric isn’t bunched and that the turning row is right at the bottom:

setup for whipstitch

Pick up one purl bump from the row just above the hem and one loop from your cast on edge:

first stitch

Pull the yarn through, and go back to the purl bump row making a single spiraled loop:

second stitch

Pick up the next purl-bump-and-loop pair as described above and pull your next stitch through. Continue this process along the edge of the hem:

continue stitching

Make sure that you’re pulling the yarn just tight enough to hold the two layers of fabric together. Don’t pull too tightly, or your seam won’t have any stretch to it.

not too tight

If it looks like this, your stitches are too tight. And knitted fabric is so stretchy, you really want a stretchy hem to match!

Two caveats here:
1) If you cast on fewer stitches and increased in the turning row then your cast on loops and the purl bumps won’t line up all the way around. You’ll need to skip as many purl bumps as the number of increases you made. Be sure to spread them evenly around the hem.
2) If you made biased fabric by knitting stitches through the back loop then the columns of stitches in the fabric won’t line up exactly with the columns in the hem. But if you let the hem slant naturally in the first step this won’t be a problem.

If you really can’t wrap your mind around seaming you can always use this backup method: Do a provisional cast on instead. Work your hem, your turning row, and then your knitted fabric. When the fabric is as long as the hem remove the provisional cast on putting all those stitches on a second needle. Now knit 2 together using 1 stitch from the outside of the fabric and 1 stitch from the hem all the way around. This joins the hem seamlessly to the garment (assuming you’ve got the same number of stitches in both – as for caveat 1 above)

I really find this MORE complicated and time-consuming that stitching the hem up at the end. But the wonderful thing about knitting is that we each can choose our own favorite way of doing things! Whichever way you like best, I hope you’ll try a turned hem project. I really think they’re a fabulous way to edge a piece of knitted fabric.

*I have 7 designs with turned hems: La Moelle, Queen City, Hyde Park, Aperture, Emma Woodhouse, Hirta, Morningtide, and Lime Sorbet.

**if you have an odd number of stitches, be careful you don’t accidentally screw up your stitch count.

Inspired

Way, waaaaaay back I was inspired by two posts from Grumperina, one about earrings, and the other about necklaces. (waaay back before pinterest, hey did you know I’m on pinterest now?)

Anyway, the ideas percolated in my head for over a year. Then about 6 months ago I went out and bought half the supplies I needed* at a craft store.

supplies

But not the wood for the frame. I originally thought I was going to do something awesome and rustic using natural tree branches. Yeah, that never happened. So I finally broke down and got some balsam wood for the frame. While this is the same idea as in the links I have my own take on the project. My version uses less glue and more staples. We all have our preferred shortcuts!

frame

Using balsam wood was interesting, did you know you can push the nails in with your fingers? No hammer required!

attach cloth

I used counted cross stitch fabric for the canvas, I figured the little holes would make it easy to hang the earrings. I trimmed the corners so it wrapped around the frame just right and stapled it into place. I put tiny cup hooks along the bottom edge for my necklaces, bracelets, and hoop earrings.

organizer hooks

Tada! I love this display so much. I love wearing earrings but frequently forget to put them on in the morning. With this display hanging right next to my bathroom mirror I don’t forget anymore.

jewelry organizer

And it’s pretty! Bathroom decorations are something I struggle with (because there’s always the chance the cats will knock something into the toilet) but I think this qualifies as a decoration as well as a storage solution, right?

organizer2

right! Now the only question is: why did I wait so long to do this?

organizer1

*including lots of french hooks for earrings, because while those are my favorite only about half my earrings used them. After a little time with a package of empty hooks and a pair of needle nosed pliers ALL my earrings use french hooks. Anyone need some slightly used earring loops?

extra hooks

hidden modifications

One of the great things about knitting is being able to make garments that fit just right – right? Of course we all have stories of the sweater* that was 4 sizes too big. Between gauge mistakes, errata, and user error these things happen. But, assuming we can avoid (or rip out) such things a perfectly fitting garment should be possible. This is what I mean by “hidden modifications” these are the changes knitters make to a garment so it will fit them perfectly, but which an observer would never know had been changed!

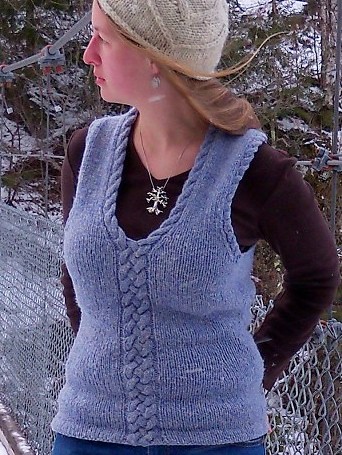
I’m going to take a moment to give some tips and tricks for my La Moelle vest pattern. I have some specific tips, but you should be able to take away the more general ideas and apply them to any garment you’re working on.

All garment patterns should have a schematic**, it will be your tool to figure out what the designer intended, and how to make things better for you – personally.

schematic

A schematic might seem a little intimidating at first. But remember, the designer (me in this case) is packing all sorts of information into this for every size. You’re probably just knitting one size (or maybe 2-3, I’ll address that soon) Another thing to keep in mind is that the schematic shows the actual measurements of the GARMENT this may not be your size, in fact it probably isn’t.

Start by getting a tape measure and measuring yourself (or having a friend do it, which is probably more accurate) you’ll need bust, waist, hips – but also length from underarm to natural waist, underarm to low hips. If you want to be really accurate measure yourself at every point indicated on the schematic. Honestly, knitted fabric is pretty stretchy and I usually just go with the main points when knitting for myself, but then I’m a pretty average size. If you know you’re broad shouldered, narrow waisted, or have a long torso then you’ll know to pay more attention to these points.

In the pattern I state that this vest is good with zero, or even negative ease. That means that if you have a 36″ bust you could knit the 36.5″ size and have a little extra ease in the bust, or you could knit the 33.25″ size and have some stretch (this is a personal choice, think about how you like your other sweaters and t-shirts to fit). As you choose which size you want to knit look at suggestions from the designer, or how the garment fits the model. If you really like how an oversize A-line tunic drapes on the model in the photo – you’ll probably want to choose a size that is a few inches bigger than you.

Once you’ve decided on the best bust measurement, if you’re lucky the waist and hip measurements will line up for you as well. If so, then congratulations! Go read a book or something. If you’re not let’s continue on.

I’m going to address modifications in width/circumference first, then modifications in length. Everyone is unique, so you may need one, the other, or both.

Let’s say you’ve found a bust size that works for you with your chosen ease, and the corresponding hip size is fine, but you’re narrow waisted and need a smaller waist. You just need to add in some extra decreases, right? Well look at the schematic again, see how the hip decreases go in to a point at the waist, and then right back out again for the bust increases? I’m telling you something here: specifically there’s not a lot of “work even” rounds at the waist. So if you need to add more decreases you can’t just work an extra repeat or three of the decrease round – unless you want a garment that’s longer than the vest in the picture (which is already tunic length and comes down to the low hips) Still, it’s not a tricky change, just one that needs some advanced planning. Just start the decreases a little earlier (aka when the hip fabric measures an inch or so less than directed) If you have the opposite problem and want a less-narrow waist you can do the opposite: start the decreases a little later and work fewer of them. Either way remember to work a similar number of bust increases to get back to the correct size.

Which brings me to my next point: let’s say you need some extra fabric at the hips. Rather than doing a lot of math to figure out how many stitches to cast on, look at the other sizes on the schematic. If one of them is close to what you need you can just work more than one size. Cast on with that larger number, and start the decreases a little earlier (as I addressed above) so you can work some extra repeats of the decrease row. Once you’re down to the given number of stitches for the size you need for your waist/bust measurements you can follow those directions through the rest of the garment. See? By following two of the given sizes you can skip some extra math and still get a nicely fitting garment. If you’re trying this I HIGHLY recommend planning you knitting in advance and going through the pattern with a highlighter. That way you don’t have to try and remember that you’re knitting the size 41.25 for the hips, decreasing an extra 2 times for the waist, and then following the directions for the 36.5″ bust. Sure it makes sense now, but if you get distracted by that pretty shawl for 2 months – do you think you’ll remember come fall? I wouldn’t…

Making changes for length follows a similar logic, in the case of La Moelle it’s easier because for most of the “work even” portions I’ve given a length (in inches and centimeter) so you can work even for 2.5″ instead of 3″. If you’re working on a pattern that gives row counts instead you’ll have to treat them like stitches, but instead of doing a lot of math consider shifting up or down a size like I recommended above. As always, look at what the schematic recommends, and consider how it’ll fit your body.

For instance, if you know you’re high waisted you’ll want to knit the even portion at the hips longer than recommended, and the even portion at the bust an inch or two less to balance it out. I’ve given the hip height and bust height separately specifically so these changes can be made. If you’re petite (or just don’t like tunic length vests) you can take 1 inch off of each “work even” area for an overall shorter garment. If you know your natural waist is long, maybe you want to work even there instead of starting the increases shortly after the decreases are done. Balance this out by working less length in the hips and you’re good to go.

Overall I think the take away message is this: Measure yourself. Know your body and how you’re different from “average.” Remember that patterns are sized to averages because honestly, we designers haven’t got anything better to work with. But even (especially?) designers know that almost no one is that magical “average” number. Use the schematic as a tool to see how the vest (or other garment) is meant to fit that average number (for each size) and consider what the fit would look like in your perfect pattern – the one written just for you. Choose a size, or sizes, based on what you want, and just do a little math to transition from one to the next – rather than trying to re-do all the math and basically re-writing the pattern.

Got questions? I’ll make up some answers! I can’t (don’t have the time or inclination) re-size patterns for everyone, but I’m happy to clarify on any of these steps if I’m not making sense.

*For me it was a bamboo tank top. My gauge was off (no I didn’t check it first, why do you ask?) I was working (what I thought was) a size 36 on 24″ circular needles – so I didn’t realize how far off I was until I divided for the front/back. At which point I discovered that the half-garment on hold on scrap yarn was big enough to fit over my head and shoulders without needing to use any of the fabric on the needles. That’s right, it was TWICE my size. Luckily it knit up twice as fast the second time around.

**Note – I said “should” I’ve seen garment patterns without schematics. In fact I’ve knit some of them. And as a pathological modifier it makes me cranky every time. Hats, socks, mittens without schematics? Fine. Garments, even ones with standard construction, really should have them.

A chance to learn something new

Last night I had a chance to learn a new(ish) way to do provisional cast on – and I’m so excited about it I need to share!

I started Dulce De Leche last night, and it begins with a provisional cast on of TWO HUNDRED AND FOURTEEN stitches. The goal is to make a turned hem with no sewing. And while I liked that idea a bit, I don’t hate sewing and if forced to choose between doing a crochet cast on that long and a little seaming, I’ve always been that knitter who chooses the seaming.

Don’t get me wrong, I enjoy the seamless look of provisional cast ons, and I’ve used shorter ones in many designs. But I always have issues with them unzipping (or not, as the case usually is) properly and I didn’t want to fight with a badly picked up crochet chain that long.

But then I remember one of the Mason-Dixon ladies posting about performing the crochet cast on AROUND the needle rather then trying to pick up the purl bumps later. She found it solved the difficulties of the crochet cast on that I always fight. So I decided to be brave and try something new. Note! I don’t have internet at home, so there may be a million tutorials on this already, but I just had to make it up as I went along. Whatever, it wasn’t too hard to figure out, and she (I don’t remember if it was Kay or Ann) was RIGHT! This cast on was simple and quick, I didn’t have to pick up purl bumps, and the chain should rip out smoothly when I get to that point. Also I didn’t have to worry about leaving a tail long enough, which would have been a problem if I skipped the provisional cast on.

So here it is. I started by making a normal single crochet chain a few stitches long first (I’m assuming you know how to do that). Then I got my knitting needle, and held it behind the crochet chain. I brought the yarn around the needle and then to the hook:

cco1

Pull the strand through the loop, just like always, and you have 1 cast on stitch:

cco2

And just keep repeating, until you have the number of stitches you need:

cco3

I even made a video*:

See, smooth and quick and the stitches are all lined up on the needle ready to knit! I actually enjoyed this cast on method. So YAY! for learning something new!

*I hope that works. I don’t have the latest version of flash player on my computer, so I can’t even test it. If you’re having trouble seeing it could you let me know? Actually, let me know if it works too – since I have no idea…